
Posted by Jason Lillywhite

In this blog post, I will walk through the process of setting up this type of model in GoldSim. Hopefully this will provide a good resource for those of you working on conceptual water balance models for your projects.
When simulating ponds and reservoirs in GoldSim, one of the most common types of systems we see are the combination of controlled and uncontrolled discharges. Examples of uncontrolled discharges include evaporation losses and flood flows over a spillway. Examples of controlled discharges include water that is pumped out or flows through an opening in the outlet works. Controlled outflows deliver water to service necessary uses downstream such as irrigation or industrial water demands.

The model I will use for this tutorial will simulate 1 inflow and 3 outflows. The outflows include:
- Uncontrolled losses (like evaporation)
- Controlled discharge (representing a pump that is turned on or off without varying flow rate)
- Uncontrolled overflow (representing average daily flow over a spillway)
The first step of the model building process is to define the attributes of the system. This model has the following major attributes:
- Inflow (use a Stochastic element to simplify the model with random values over time)
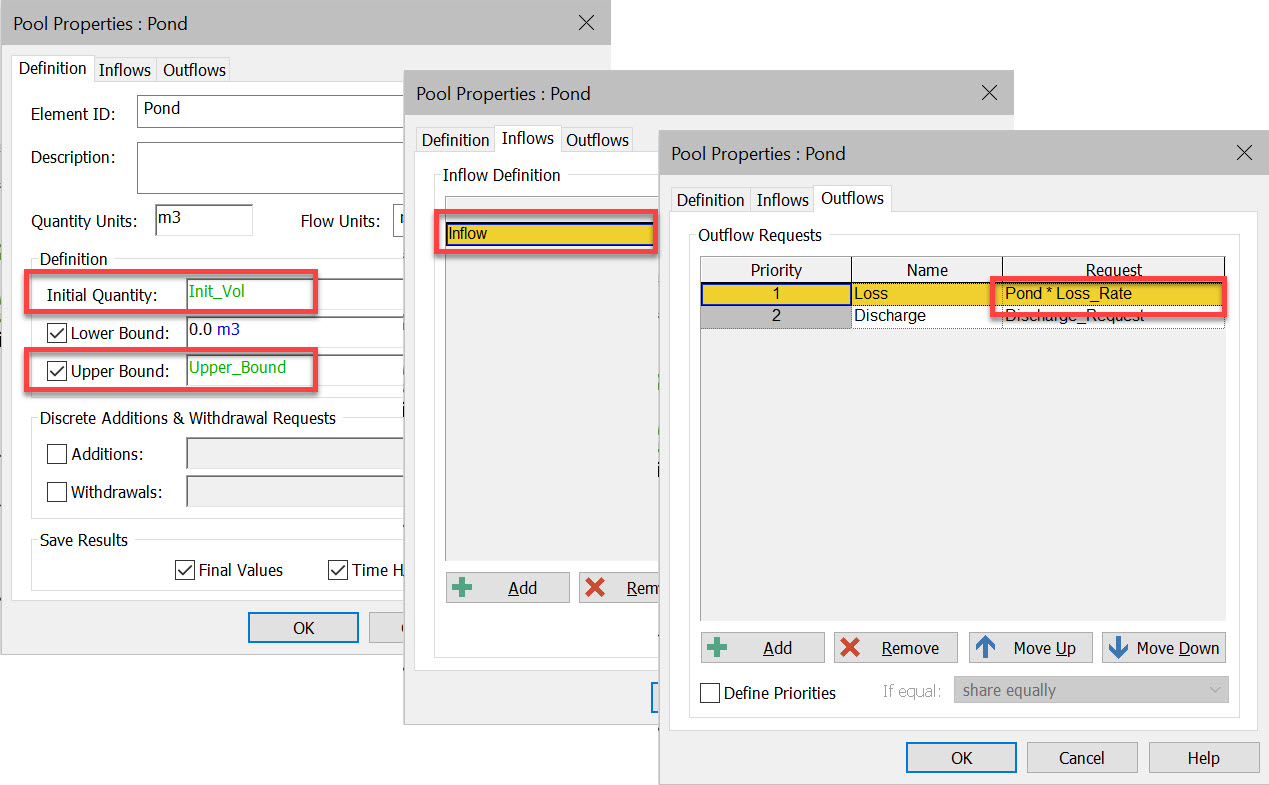
- Init_Vol (the starting volume at ETime == 0 days)
- Upper_Bound (the maximum allowed volume stored in the reservoir)
- Loss_Rate (the unit rate of loss as a function of the volume)
The screen capture below shows how this would look in the graphics pane of GoldSim.

The next step is to set up the discharge controls. Discharge from this reservoir is controlled using a Status element that turns the discharge on or off depending on the volume in the reservoir. A True state in the Status element indicates the discharge request is ON while a False status indicates OFF. The discharge request turns on when the reservoir water level exceeds the target volume (Target_Vol) plus the deadband but does not turn off until the reservoir volume drops below the target volume. The deadband is a distance above the target volume that prevents rapid oscillation of the Discharge_ON state. Rather than switching states at the moment the reservoir drops back below the target, the deadband will allow the level to rise above the target somewhat before switching to ON state again.

A Selector element is used to define the outflow request that will drive the outflow from the Pond. Take note that this is just a request and not the actual outflow output. It is good practice to keep these separate from each other so you can differentiate between information that drives the model and simulation of outflows. Below is s a screen capture showing the properties of the Selector element that is the discharge request.

The Selector output is referenced in the Pool element requests:


The end result of this model is a Time History plot that shows the Pond volume compared to the target volume along with the inflow and outflows.

You can download example models from our library that demonstrate the use of the Status element and modeling evaporation from here:
No comments:
Post a Comment